SAML
Enterprise
Connect an identity provider that speaks SAML 2.0, such as AD FS, Shibboleth or Entra ID. People select Sign in with and the provider's name on the sign-in page, sign in there, and come back signed in. For what all providers share, see Sign-in providers.
Before you start
- At the identity provider, you may add a service provider (also called relying party or enterprise application).
- You have the identity provider's metadata: an address it is published at, or the XML file.
Register Fadenstack at the identity provider
- In the console, open Access Control → Sign-in providers, select Add provider and pick SAML 2.0 under Kind.
-
Enter the Name, check the Key and the Server address. The dialog now shows three values:
In the console At the identity provider Metadata address The service provider's metadata. Most identity providers read everything from it. Entity ID The identifier (entity ID) of the service provider. Empty: the metadata address. Give another one only when the identity provider knows this server by it already. Assertion consumer service (ACS) The reply URL; answers come back to it by HTTP POST. -
At the identity provider, add the service provider with the Metadata address, or with the Entity ID and the ACS address.
- Have it send:
- a persistent NameID, or the
subject-idorpairwise-idattribute: a value that stays the same for a person. A transient NameID is refused; - the e-mail address (
mail,email, or the e-mail address claim of Microsoft's identity providers); - optionally the display name and the groups (
displayName,groupsormemberOf).
- a persistent NameID, or the
Fill in the identity provider's fields
| Field | What goes in |
|---|---|
| Identity provider's metadata | From its address: the address it publishes its metadata at (https://). Pasted: the XML of its metadata. |
| Its e-mail addresses are verified | Tick it when the identity provider is your organisation's own: SAML does not say whether an address is verified. Otherwise list your domains under Allowed e-mail domains. |
| Sign the requests sent to the identity provider | Only when the identity provider asks for signed requests. The certificate is in the Metadata address. |
| From a federation's metadata service (MDQ) | Instead of an address or pasted XML: the federation's metadata query service, and the identity provider's Entity ID. Fadenstack asks the service for that one provider. |
| Certificate the metadata is signed with | When your federation signs its metadata: its signing certificate (PEM). Then only metadata signed with that certificate's key, and with a validUntil date, is accepted. Required with a metadata service. |
| Sign out at the identity provider too | Signing out of Fadenstack signs the person out at the identity provider as well, when its metadata names a single logout service. |
| End sign-ins when the identity provider signs someone out | When the identity provider signs a person out, all their Fadenstack sign-ins end, in every browser and app. Only sign-ins made while this is on are found. |
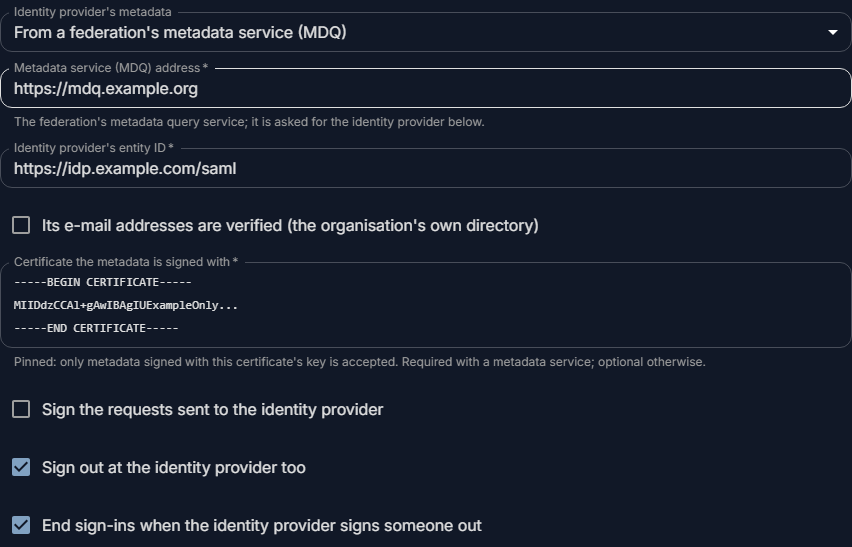
With either logout switch on, register the Single logout service (SLO) address the dialog shows at the identity provider, as you did the ACS. Logout messages must be signed by the identity provider; unsigned or altered ones are refused.
Metadata is read up to 2 MiB, pasted or fetched (FADEN_AUTH_SAML_METADATA_MAX_BYTES on the sign-in module).
Metadata past its validUntil date is refused. Fetched metadata is fetched again when its cacheDuration
ends, after an hour at the latest, or when it expires; while it cannot be fetched, signing in with that
provider is refused. A change to a provider holds at the next sign-in, in every worker of the sign-in module.
Then decide who may sign in (see Sign-in providers) and select Add provider.
Note
Every answer's assertion must be signed by the identity provider; unsigned ones are refused.
Entra ID
- In the Microsoft Entra admin center, open Enterprise applications, select New application, then Create your own application, and pick SAML as the single sign-on method.
- Under Basic SAML Configuration, enter the Entity ID as the Identifier and the ACS address as the Reply URL.
- In the console, pick From its address and paste the App Federation Metadata Url.
Entra ID sends groups by their object ID: group rules name the ID, not the group's name.
Okta
- In the Okta Admin Console, select Applications → Create App Integration, pick SAML 2.0, and name the application.
- Under Configure SAML, enter the ACS address as the Single sign-on URL and the Entity ID as the Audience URI (SP Entity ID).
-
- Name
urn:oasis:names:tc:SAML:attribute:subject-id, name format URI Reference, valueuser.getInternalProperty("id"): Okta's ID for the person, the same one its provisioning sends. Okta's NameID is the e-mail address, which can change, so it is no ID. - Name
email, valueuser.email.
Under Attribute Statements, add two:
In newer consoles, they are on the Sign On tab under Attribute Statements → Show legacy configuration.
- Name
-
In the console, pick From its address and paste the Metadata URL from Okta's Sign On tab.
When it does not work
| You see | What to do |
|---|---|
| "The sign-in service cannot be reached right now." | The sign-in module could not read the identity provider's metadata from its address. Check that the server reaches it over HTTPS, or paste the XML instead. |
| The identity provider says the reply URL or entity is unknown | Register the Entity ID and the ACS address exactly as the dialog shows them. |
| "The sign-in did not work." after the identity provider | The answer was unsigned, for another service provider, too old, or named the person by nothing that stays the same. Logs → Audit says which: auth.sign_in.refused for the provider, with the reason (no_stable_subject: send a persistent NameID or subject-id, see Okta above). Check the identity provider's settings for this service provider. |
| "The provider did not give your e-mail address …" | Have the identity provider send the mail or email attribute. |
| Signing out leaves people signed in at the identity provider | Switch on Sign out at the identity provider too; it holds for sign-ins made after that. The sign-in service's log says why it did not go on (no_slo_endpoint: the provider's metadata names no logout service). |
| The identity provider's logout does not end the sign-ins here | Switch on End sign-ins when the identity provider signs someone out and register the Single logout service (SLO) address there. Logs → Audit shows auth.sign_out.provider for each sign-out, and auth.sign_out.refused with the reason for a message refused (signature, destination, stale, ...). |