Users, groups and roles
Everyone who uses Fadenstack signs in with an account. This page shows how to create accounts, what roles and groups give people, and how to end someone's access.
Before you start
- You are signed in to the console as a Superuser. The pages are under Access Control: Users, Roles and Groups.
What the console and the roles are for
- The console is for superusers. Anyone who is not a superuser lands in the chat when they sign in, whatever their roles. Make someone a superuser only if they set Fadenstack up with you: a superuser can do everything.
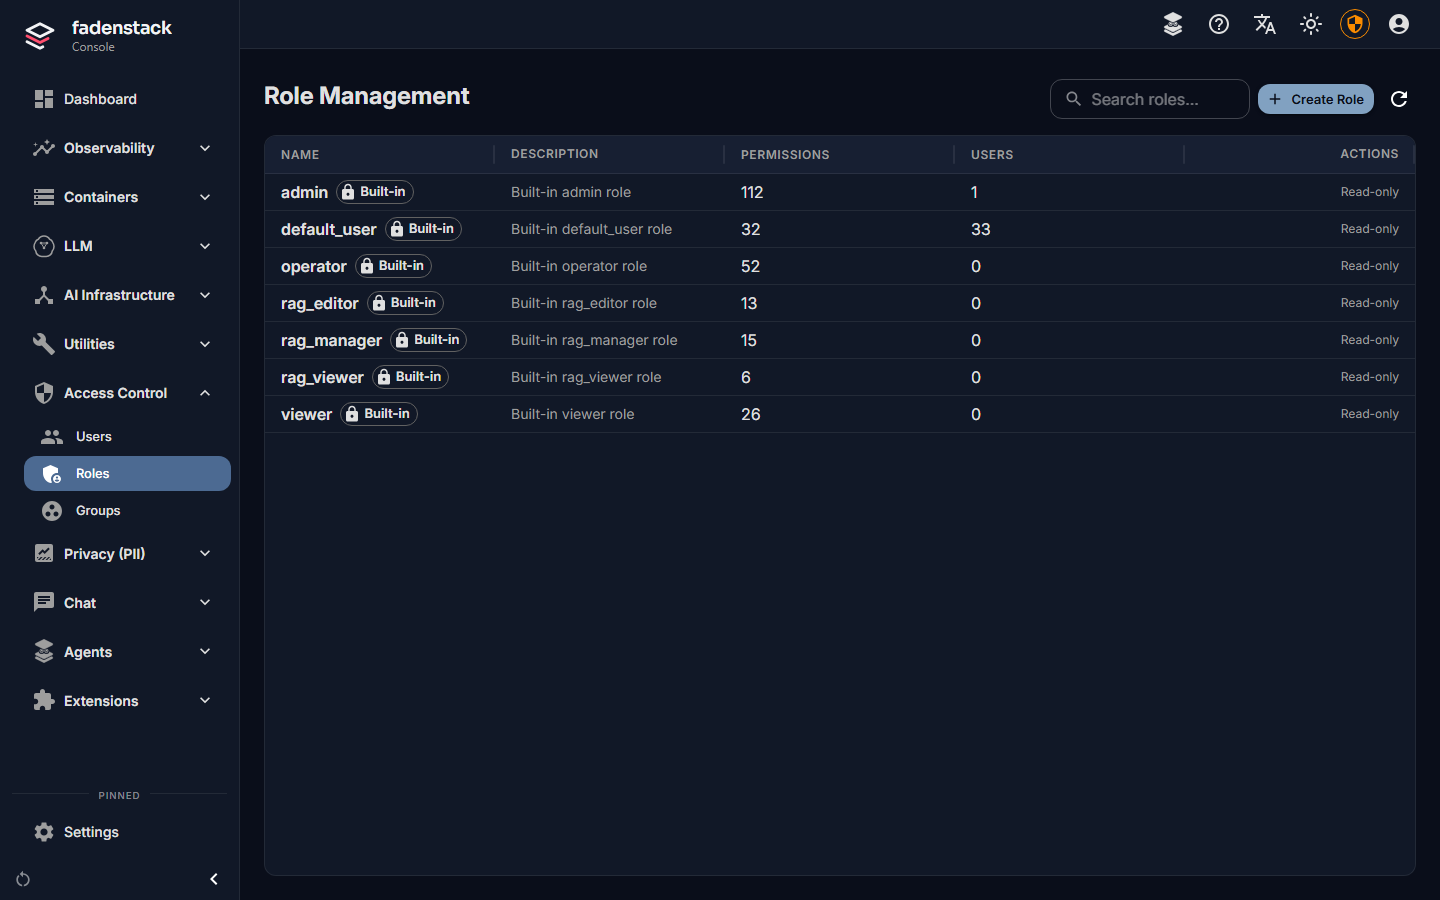
- Roles decide what everyone else may do: in the chat, on their own Skills and Agents pages, and through the API with an API token. A role is a set of permissions. The built-in roles cannot be changed or deleted.
| Role | Gives |
|---|---|
default_user |
The chat: chats, projects and attachments, their own skills (create and share), and reading the knowledge base's collections that are open to them. Every new account gets it unless you pick other roles. |
viewer |
Reading the state of models, clusters, machines, containers and logs, through the API. |
operator |
What viewer gives, and running models through the API: creating, changing, scaling, stopping and starting clusters and deployments. Not deleting. |
admin |
Every permission, including deleting, making a skill visible to the whole organisation (skills:publish), administering every skill (skills:manage), and creating and deleting agents (agents:create, agents:delete). |
rag_manager, rag_editor, rag_viewer |
Managing or editing the knowledge base (rag_manager, rag_editor: they see every collection and set who reads each), or reading it (rag_viewer). |
Note
Roles you tick replace default_user. For someone who should also chat, tick default_user as well.
Who reads which collection
Each collection of the knowledge base is open to everyone who uses the chat, or only to the people and groups you choose. A collection that is not open to someone hides everything inside it from them too, even a sub-collection that is open to everyone. Their searches do not find its documents, and its documents are not there for them.
- Open RAG → Knowledge Base and point at the collection.
- Select Who can read it (the lock icon).
- Choose Only these people and groups, add people or groups, and Save.
A restricted collection shows a lock beside its name. Superusers and the knowledge base's managers
(admin, rag_manager, rag_editor) see every collection. An agent searches only the collections chosen
under Knowledge in its definition, and only those its user may read.
Add a person
- Open Access Control → Users and select Create User.
- Enter their e-mail address and a first password of at least 6 characters.
- Leave Superuser off, unless they administer Fadenstack with you.
- Under Assign Roles, leave everything empty for people who only chat: they get
default_user. Tick roles for anyone who needs more, and tickdefault_usertoo if they also chat. - Select Create User.
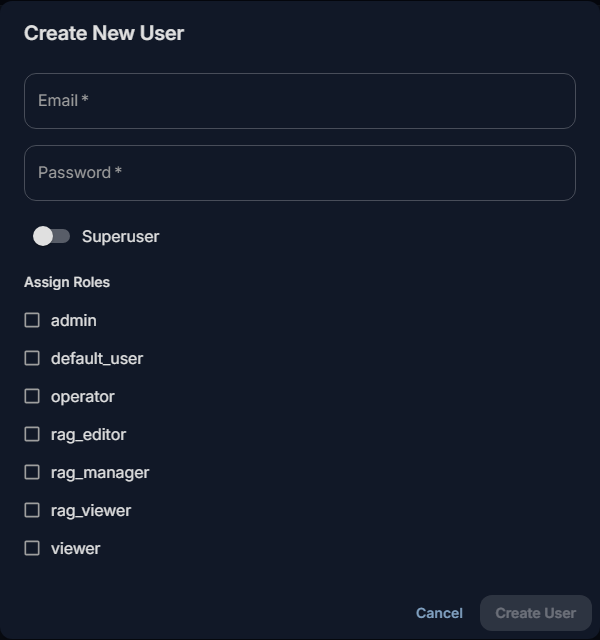
The account is active at once. Pass the first password on in person or by phone, not in the same e-mail as
the address. They sign in at https://ai.example.internal, land in the chat, and can change the password
under Manage Profile (see Your account).
There are no invitations: you create each account. Signing in with your organisation's company account (single sign-on) is Planned: people will sign in with the account they already have, and get a Fadenstack account the first time they do.
Change what someone may do
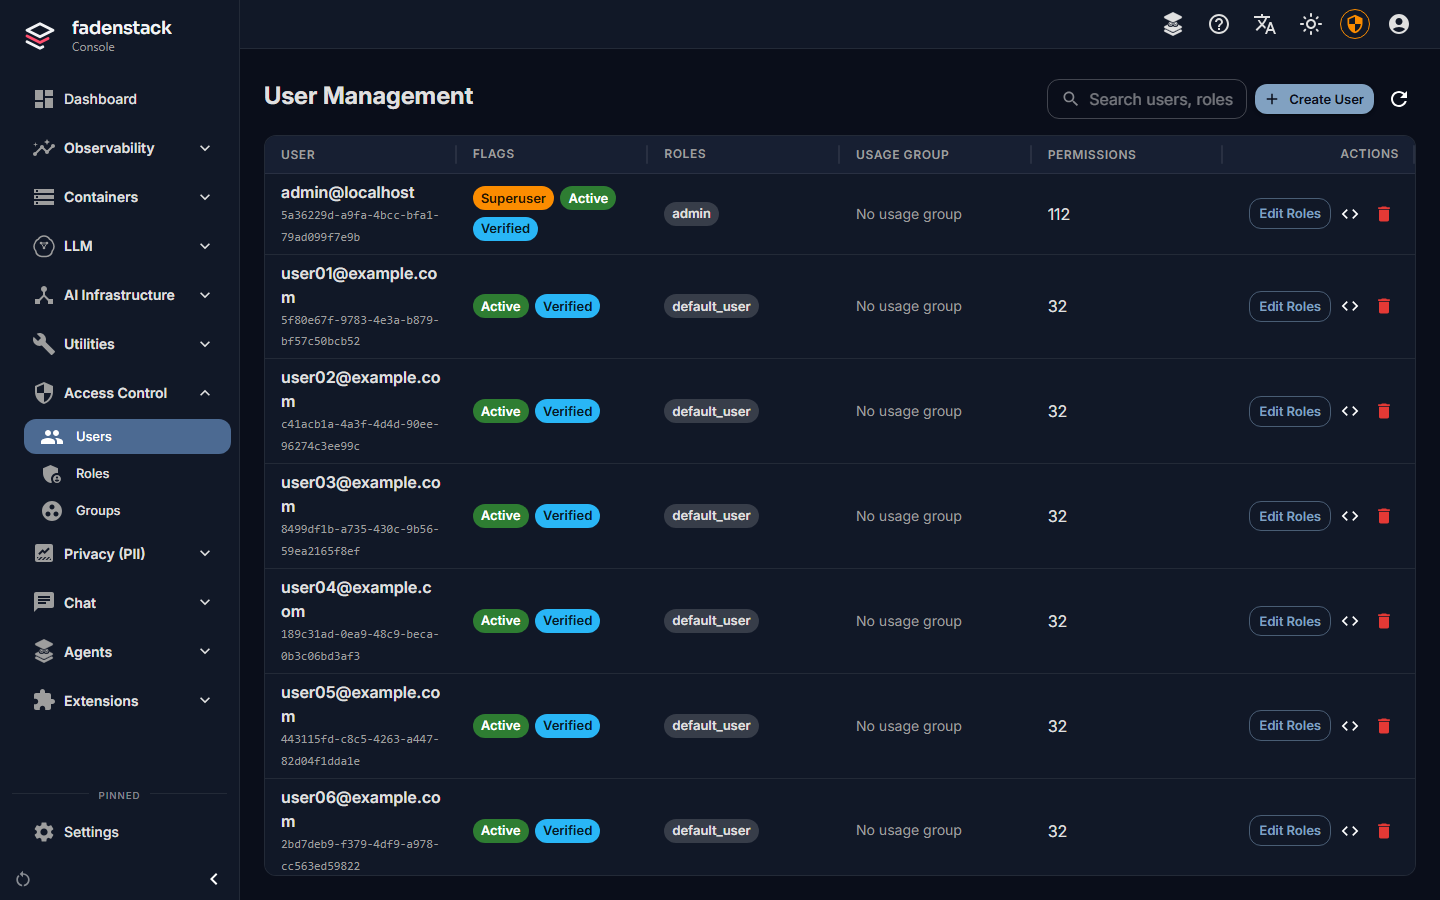
- Open Access Control → Users and select Edit Roles in the person's row.
- Tick or untick roles.
- Pick their Usage group: the group their usage counts towards (see Groups).
- Select Save.
The table shows each person's flags (Superuser, Active, Verified), roles, usage group and how many permissions they have in all. The search box finds people by e-mail, role or permission.
Roles of your own
When no built-in role fits, make one:
- Open Access Control → Roles and select Create Role.
- Give it a name and a description.
- Tick its Permissions, for example
agents:createfor people who may set up a browser agent for their team, orskills:publishfor people who may share skills with the whole organisation. - Save it, and give it to people or to a group.
Deleting a role takes it from everyone who has it; the dialog says how many people that is.
Groups
A group gathers people, for three things:
- Roles. A group's roles apply to all its members, on top of their own.
- Sharing. Skills and agents can be shared with a group instead of with each person (see Skills and Agents).
- Usage. A person's Usage group is the group their requests are counted towards (see Usage and costs). It is set per person, on Users.
To make one:
- Open Access Control → Groups and select Create Group.
- Name it, describe it, and tick its roles under Assign Roles.
- Save it, then select Manage Members and Add Members.
Removing someone from a group takes away the group's roles. Skills shared with the group stop reaching their chats within a minute.
Developer mode
Developer mode (the code icon in a person's row) lets agents attach any MCP server running on that person's own computer. It is for people who build or test tools. It never widens what the server allows, reaches the person's agents the next time their sign-in is refreshed, and can end at a time you set under Ends. Leave it off for everyone else.
Sign-ins and API tokens
- A sign-in lasts 7 days. After that, people sign in again. You can change this under Settings → General: Sign-in lifetime (s).
- API tokens let scripts and applications use the models through the API. Each person creates their own under Manage Profile in the chat (or My Profile in the console), gives it a name and a lifetime, and can revoke it there. Applications using a revoked token stop working within a minute.
- Every API token expires: after 90 days unless its maker picks another lifetime, and after a year at most. Change these under Settings → General: API token lifetime (s) and Longest API token lifetime (s).
- An administrator can revoke someone else's token: in Access Control → Users, select API tokens (the key icon) in their row, then Revoke.
- Agents (the browser agent, the Office add-ins) have their own sign-ins on each device. You can see and sign out devices on an agent's Activity tab (see Agents and add-ins).
End someone's access
To stop someone using Fadenstack, for a while or for good:
- Open Access Control → Users and select Suspend (the person icon with a line through it) in their row.
- Confirm.
They can no longer sign in, and their sign-ins, API tokens and agents stop working within a minute. Nothing of theirs is deleted: Let back in in the same place gives them their access back. You cannot suspend yourself, nor the last superuser.
Delete (the bin icon) removes the account and cannot be undone.
When it does not work
"User with email '…' already exists". There is already an account for that address. Find it in the list instead.
Someone lands in the chat when they open the console. They are not a superuser. Roles do not open the console.
Someone cannot chat after you gave them a role. The roles you ticked replaced default_user. Edit their
roles and tick default_user as well.
Someone forgot their password. The console has no button to set another person's password. If the
server does not send reset e-mails, whoever runs it sets a new one on the server, for example
faden admin reset-password --email [email protected] (it makes up a password when none is given). Pass it on,
and have the person change it under Manage Profile.